Notifications
Clear all
General Discussion
42
Posts
8
Users
0
Reactions
4,201
Views
Making a leather holster doesn't take that long once one has the basics. It is a rewarding hobby, done whilst chatting to my wife or watching a movie. The rough work takes 45 minutes, the finishing usually slightly longer. Colouring is done afterwards.
1. Take paper (A3) and wrap it around the firearm to trace the outlines.
2. Transfer the paper outlines to leather.
3. Cut out and stitch, then wet and form it over the firearm.
4. Let dry and finish edging.
Posted : 31/03/2026 11:02 pm
Topic starter
Making a leather holster doesn't take that long once one has the basics.
100% agree. Making a basic functional holster isn't very time consuming. Making a really nicely fitted one that is finished to a standard equal or better than good commercial ones takes a much longer. I find that making the pattern & getting it right is the most time consuming part of making a basic leather holster.
Thermoplastics like ABS and Kydex are a doddle by comparison. If I break a sports holster for pistol or revolver I can crank out a replacement in an hour once the oven is on and the press set up.
Posted : 31/03/2026 11:22 pm
Topic starter
1. Take paper (A3) and wrap it around the firearm to trace the outlines.
4. Let dry and finish edging.
If you get a chance try foam sheets that you get at a craft shop for pattern making. If you get a sheet in a similar thickness to the leather it translates really well. I 'cure' he wet leather in the oven at approx 80 degrees if i want a hard shell. It works incredibly well and the leather comes out stiff and springy. Makes for really positive retention if well molded.
Posted : 31/03/2026 11:26 pm
1. Take paper (A3) and wrap it around the firearm to trace the outlines.
4. Let dry and finish edging.
If you get a chance try foam sheets that you get at a craft shop for pattern making. If you get a sheet in a similar thickness to the leather it translates really well. I 'cure' he wet leather in the oven at approx 80 degrees if i want a hard shell. It works incredibly well and the leather comes out stiff and springy. Makes for really positive retention if well molded.
Thanks, I will keep it in mind - the trick with "heat curing" works really well. I learnt it the hard way 😉
Posted : 01/04/2026 1:58 am
Topic starter
Thanks, I will keep it in mind - the trick with "heat curing" works really well. I learnt it the hard way 😉
Haha! Same here. If you get it wrong enough it causes the leather to shrink. If you are wrong and stupid enough and put it in a microwave it comes out like an amazonian shrunken head at about 30% scale.
Posted : 01/04/2026 2:37 am
Topic starter
I made a start on V2 of the pocket holster yesterday. Decided to line it to provide a little more finish protection and incorporated a few of the improvements I mentioned earlier including a welt/spacer in the hook and cover for the mag release. Because it's lined I can mark and punch out a circle through the lining to cover the mag button. My lack of practise with the stitching shows and it still needs molding, dying and edge finishing but I'm pretty happy with how it turned out.

Posted : 07/04/2026 2:02 am
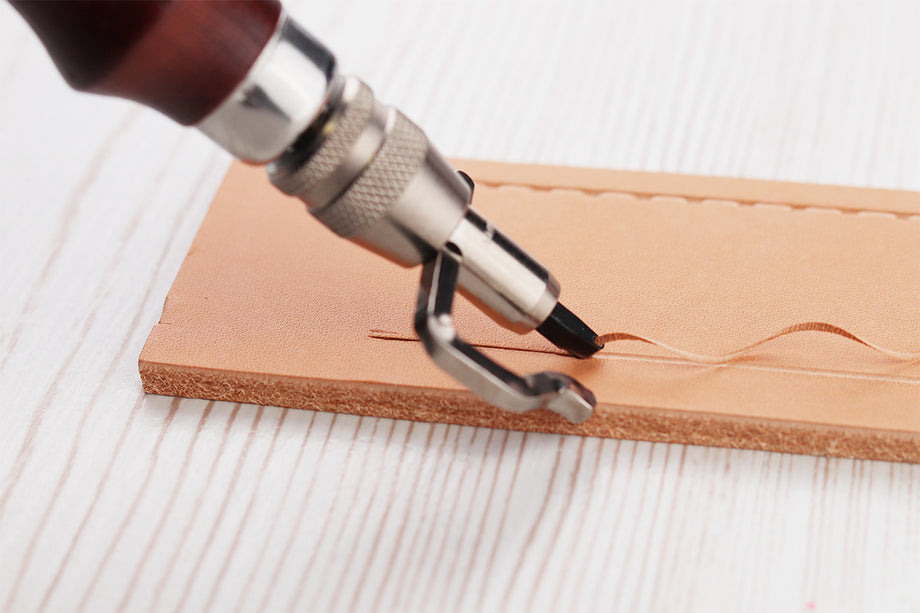
How do you prep the leather for stitching? Elongated bladed punch, small holes, or how? It makes a big difference.
I also found better results with doubled, waxed yarm and two-way stitching.
Posted : 07/04/2026 1:56 pm
Topic starter
How do you prep the leather for stitching? Elongated bladed punch, small holes, or how? It makes a big difference.
I also found better results with doubled, waxed yarm and two-way stitching.
Apologies DsJ, I missed your post. I use stitching irons that I got from Goldsmith & Jewellery Supplies to make the holes. I have 4, 5 and 6mm spacing versions in diamond and round and this one was done with 4mm round. The round ones are like ganged mini hollow punches so they take out a core rather than just pushing in a hole. The round ones give a plain dotted line effect while the diamond shaped ones leave stitches that are at a slight angle and look more like they were done with a machine. I punch the holes into a groove cut with an adjustable groover so that the stitches sit just below the surface.
100% on the two needle and waxed yarn. I do full retard saddle stitching with a knot by going through the loop on both sides and prefer nylon thread as it is naturally slippery and more resistant to being pierced by the return threads needle than the natural fibre stuff.


Posted : 10/04/2026 1:40 am
Very interesting. Would like to see the tools in action.
Posted : 10/04/2026 11:48 am
Topic starter
Very interesting. Would like to see the tools in action.
https://youtu.be/MFDo-dtr9mk?si=LY-m7IYW3Hse048h
This is a nice overview. Doesn't show the groover being used but otherwise what I do. I dont do nesrly enough of it though so my technique is inconsistent and therefor so are the stitches. You have to do every one exactly the same. The round holes are more forgiving in that respect than the diamonds.
Posted : 10/04/2026 11:58 am
Thanks Oafpatrol!
The inconsistent stitches bothered me as well until I started with heavy waxed, thick, cotton thread (butcher's twine). I also gave attention to the tension and direction of the pull on the yarn.
Posted : 11/04/2026 12:33 am
Topic starter
Got a gap to finish up the pocket holster last night. Will be making a pocket two mag carrier to match next.

Posted : 13/04/2026 12:51 am
Page 3 / 3
Prev